
Deploying Community changes using Change Sets
As a community manager, you need to be able to create and test changes to your community in a non-production environment. Salesforce offers a couple of different options and types of sandboxes (see Sandbox Types and Templates) that allow you to copy your production to a test environment (sandbox) for development and testing.
You should not be making untested changes in your production organization even though you can do some limited testing in Preview mode within Builder. If there is a problem, you want to catch and address any issues outside of the site your customers are using. Worse yet, you risk causing issues that will impact your customers ability to do business with your organization.
While there are many different approaches, at a minimum for a standard community site with limited to no custom development, having a partial sandbox and making changes there, will insure that changes are tested without impacting your production community.
Community change process
Note:
- This process is not for the initial community deployment. This is for changes to an existing community.
- Assumes the partial and production environments are identical before changes are made in the partial sandbox.
- This process will overwrite the entire production community.
Process:
- Complete and configure your changes in the sandbox (full, partial, or dev).
- Test all changes.
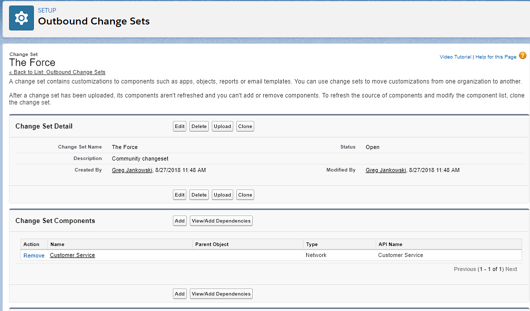
- Create an outbound changeset.
- Add network as one of the items.
- View and add all dependencies.
- Select Upload and select the target organization. The target org needs to be configured to allow uploading of changesets.
- Insure you have a communicated time for the a system update. Preferably off-hours.
- Open Setup / Incoming Changesets in the production org.
- Select the changeset to deploy.
- Validate the change before continuing. If there are any issues, address these before deploying.
- Once you have verified the changeset, you can use Quick Deploy to update production.
- Configure any additional settings in production.
- Open Community Builder and retest your updates.
- Publish the community.
Deploy a community using the Metadata API
More advanced user can use the ANT migration tool to deploy communities. See Deploy Your Community with the Metadata API
Export a Page
Ever want to create a page and use it as a template and be able to create a page just like it easily?
To export the page:
- Open Community Builder.
- Open Settings / Developer / Export a Page.
- Select the page to export.
- Once selected, the page will be available to add to a changeset as a Lightning Page.
To deploy these pages, add then as a Lightning Page to your changeset.
Once deployed, when you select New Page in Community Builder, you will see the new template page. Select it, give the page a new name, and edit any details.
Features and Settings not supported by Change Sets
There are some items that you will need to add manually after the deployment.
- Dashboards
- Navigational and featured topics
- Audience targeting
- Branding panel images
Files and assets
When adding images, PDF’s, or other files to the community, keep in mind two things:
- When you refresh the sandbox, only a full sandbox will show all the images. There is additional licensing required for a full sandbox. If you have a partial or dev sandbox this means not all images will show in the partial/dev sandbox after a refresh. Once the pages are in production they will reference the files in the production Asset Library.
- Check that any images that were add in the partial/dev sandbox also are in the changeset. If not you can add them by selecting Asset and picking the required assets.
Sandbox type file limits
Partial Copy sandboxes = 5 GB
Developer Pro sandboxes = 1 GB
Developer sandboxes = 200 MB
Full sandboxes have the same storage limit as your production organization.